
Hail Damage vs Blistering: How to Tell the Difference
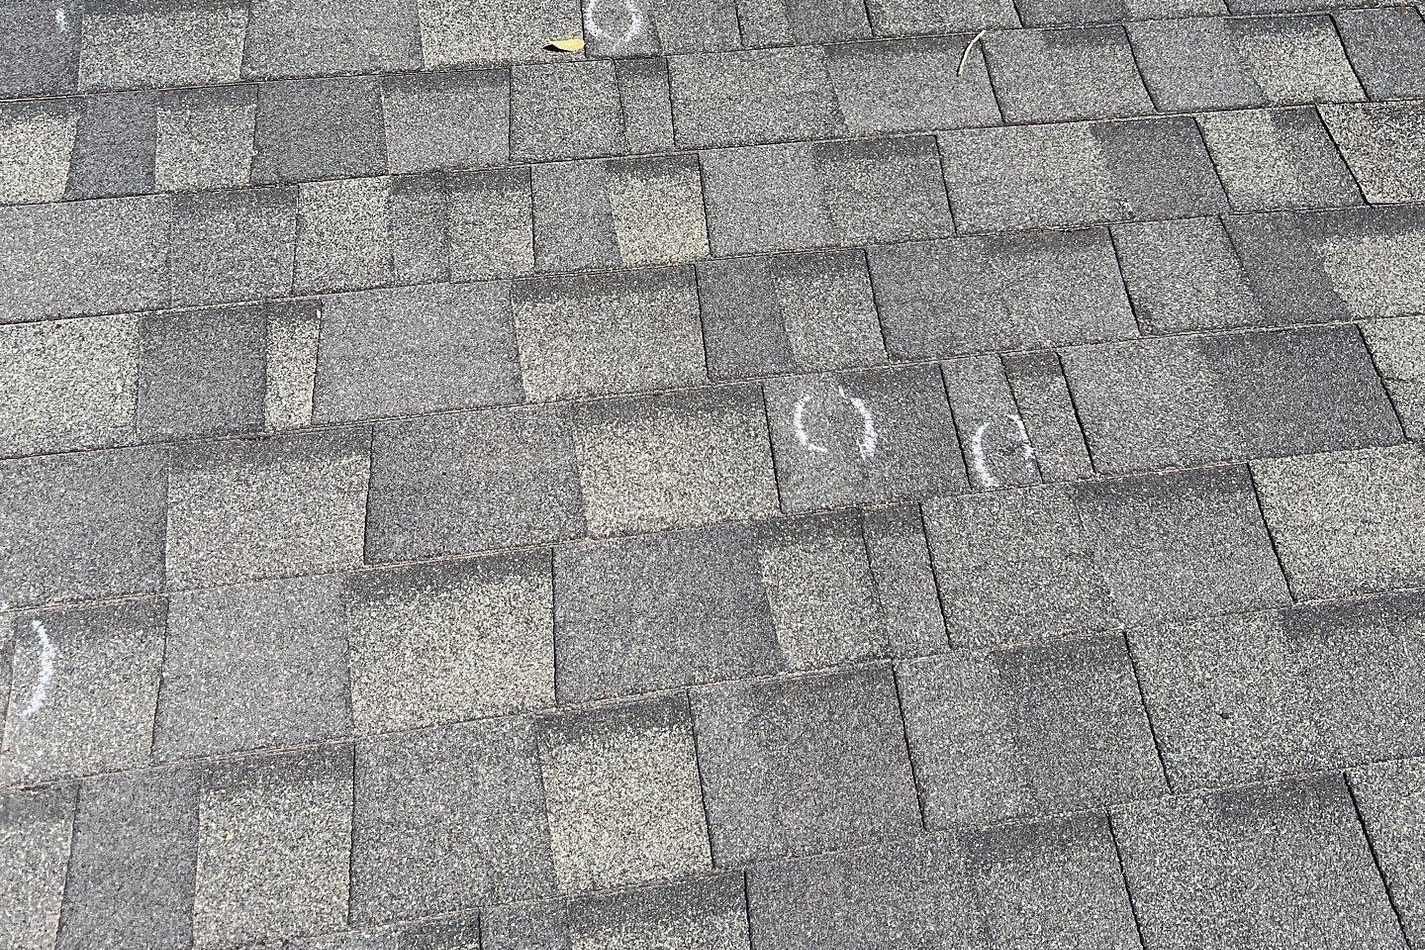
If you see round depressions with fractured mat and dents on nearby gutters or vehicles, that’s almost certainly hail. Raised bubble-like pockmarks that developed slowly with no recent storm? That’s shingle blistering. The two look similar in a quick photo, but they have completely different causes, different insurance outcomes, and different repair timelines.
Two quick checks you can do right now without climbing on the roof:
- Collateral-evidence check: Walk around your property and look at gutters, downspout caps, A/C fins, and any vehicles that were parked outside during the storm. Dents on metal surfaces are strong corroboration for hail. No dents anywhere? Blistering becomes the more likely diagnosis.
- Thumb-press test (for inspectors or when safely accessible): Press gently on the suspected area. A soft or spongy feel under the surface suggests impact fracture from hail. A firm mat beneath an exposed or raised area points to a popped blister, per InspectAPedia’s field diagnostics.
Recommended next step: Photograph everything from the ground or a safely positioned ladder, avoid walking on the roof, and call a qualified inspector or Sladeroof for an assessment if hail is suspected.
Key Takeaways
Hail leaves concave, fractured depressions after a storm; blistering produces raised bubbles that develop slowly from heat, trapped volatiles, or poor ventilation, and the two conditions require completely different responses.
| Point | Details |
|---|---|
| Hail vs blister profile | Hail strikes are concave with fractured mat; blisters show a raised rim and firm mat beneath. |
| Collateral evidence decides | Dented gutters, vents, or vehicles confirm hail; no collateral dents points to blistering. |
| Insurance coverage gap | Hail is typically a covered peril; blistering is usually excluded as maintenance or manufacturing. |
| Document before the adjuster arrives | Timestamped photos, slope-wide shots, and storm records are the foundation of a successful claim. |
| Sladeroof inspection | Sladeroof provides annotated photo reports, field-test results, and a full insurance-claim packet for Idaho, Arizona, and Wyoming properties. |
Table of Contents
- What shingle blistering actually looks like and why it happens
- What hail damage is and why the impact signature matters
- Hail damage vs blistering: the inspection checklist adjusters use
- What annotated photos from inspectors actually show
- Other clues inspectors and adjusters look for
- How insurance policies treat blistering vs hail
- When to call a roofer, inspector, or claims rep
- What a Sladeroof inspection and claims engagement looks like
- Sladeroof handles the inspection and the claim
- Sources
What shingle blistering actually looks like and why it happens
Blistering is what happens when pockets of trapped gas, air, or moisture get sealed inside an asphalt shingle during manufacturing or installation and then expand under heat. The result is a raised bubble on the shingle surface, sometimes as small as a pencil eraser, sometimes larger. When the bubble cap erodes or pops, it leaves a circular exposed area that can look a lot like a hail strike at first glance.
According to InterNACHI’s guide on asphalt composition shingles, the most common causes are:
- Manufacturing volatiles: Residual hydrocarbons trapped in the asphalt compound during production expand under heat and push up the cap.
- Poor attic ventilation: When attic temperatures spike in summer, the underside of the shingle deck heats up and accelerates volatile expansion.
- Wet decking or improper installation: Shingles installed over damp decking trap moisture that later vaporizes.
- Age-related volatilization: Older shingles lose their flexibility and become more prone to surface disruption as the asphalt dries out.
Blistering typically develops over months or years, not overnight. Early-life blistering on a roof under two years old is usually a manufacturing or installation defect and should be documented for a warranty claim. Blistering that appears on a 10-year-old roof with poor attic ventilation is a different problem entirely, one that standard homeowner policies typically exclude as a maintenance issue.
What hail damage is and why the impact signature matters
Hail damage is a kinetic event. A hailstone hits the shingle surface at speed, displaces granules, and can fracture the fiberglass or asphalt mat beneath. That fracture is what makes hail damage structurally significant: a compromised mat no longer sheds water reliably, even if the shingle looks mostly intact from the ground.
Hail forms in thunderstorm updrafts when supercooled water droplets freeze around a nucleus and get carried upward repeatedly, adding layers of ice. The National Severe Storms Laboratory explains that fall speeds vary considerably by size: small hail under 1 inch typically falls at roughly 9–25 mph, while hail in the 1–1.75-inch range falls at approximately 25–40 mph. Larger stones fall faster and hit harder, which is why a golf-ball-sized hailstorm causes far more shingle damage than a pea-sized one.
Typical visual and structural signs of hail impact:
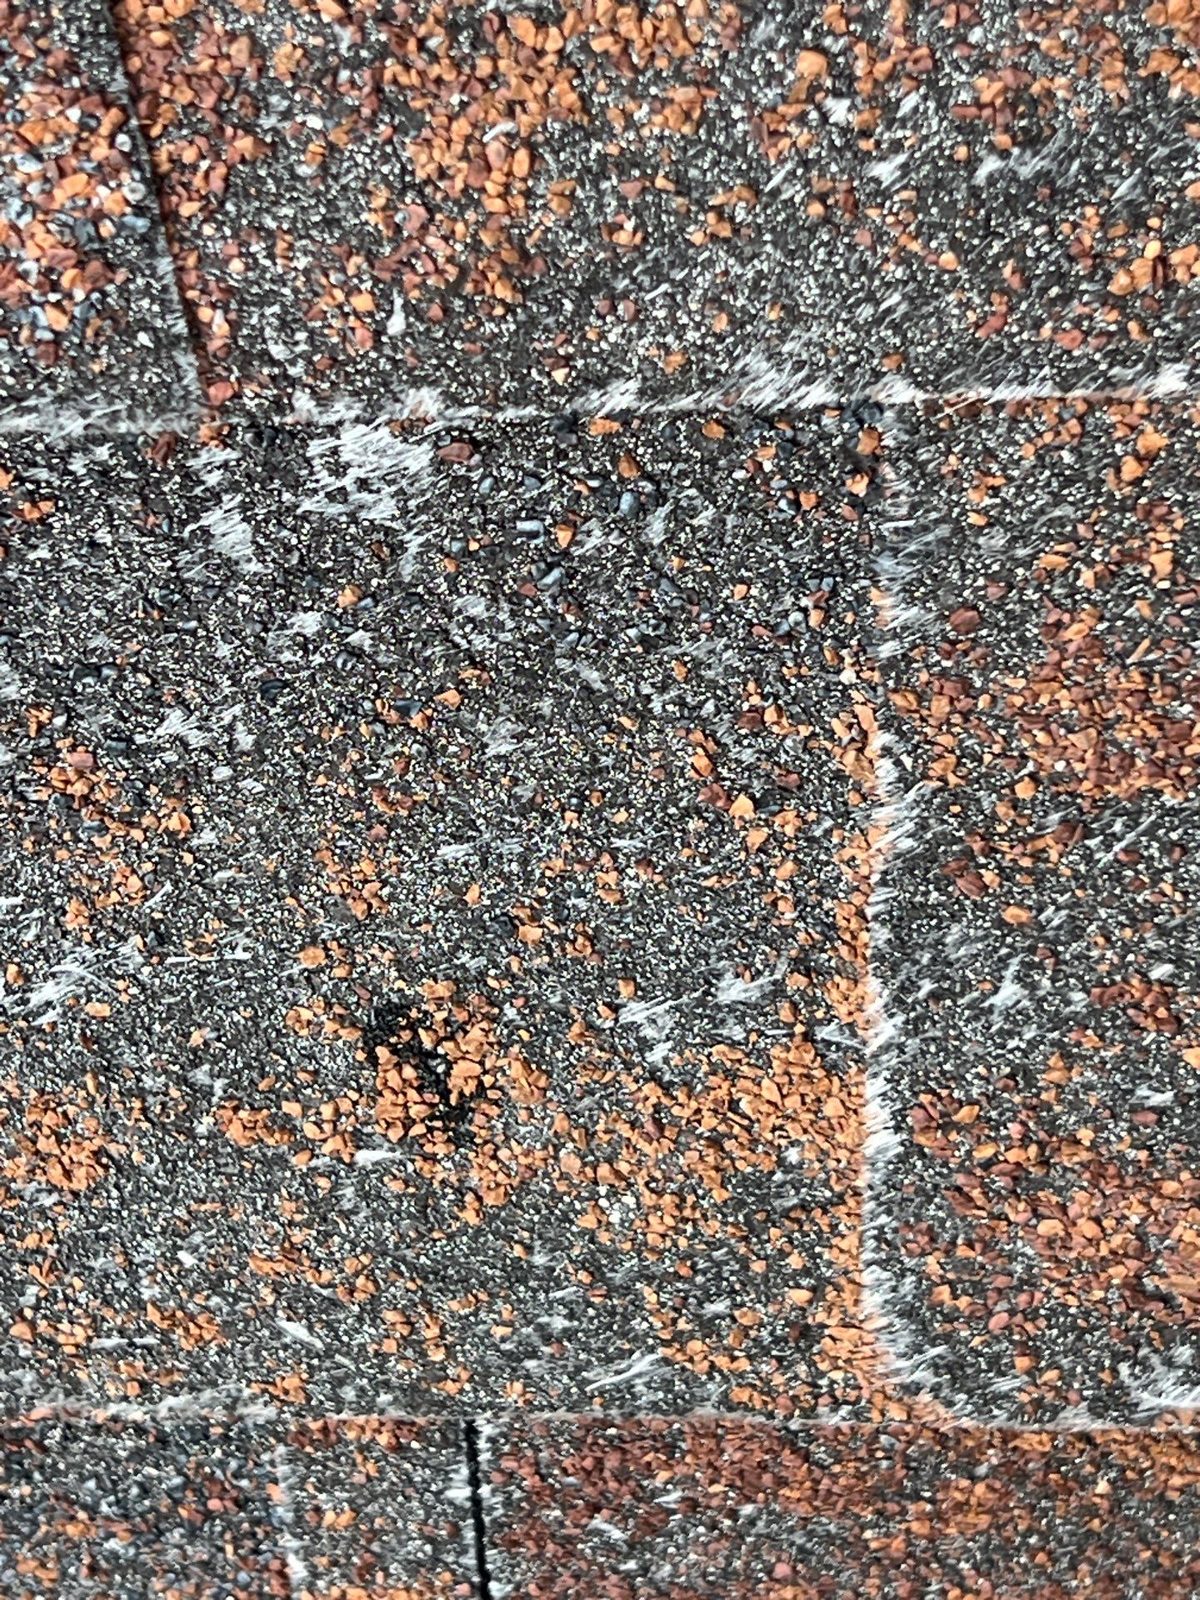
- Concave depressions: Round or slightly oblong indentations where the stone struck, often with a dark, bruised center where granules were knocked loose.
- Fractured mat: The fiberglass mat beneath the granule layer feels soft or spongy when pressed, indicating the impact cracked the structural layer.
- Granule loss in a pattern: Granules displaced from the strike zone, often visible in gutters as a sudden increase after a storm.
- Windward-slope concentration: Hail driven by wind tends to hit one or two slopes harder than the others, creating a directional pattern.
Collateral damage is the most reliable corroboration. Dents on gutters, aluminum vents, A/C condenser fins, or vehicles parked outside during the storm all confirm that hail fell with enough force to cause impact damage. No collateral dents anywhere on the property makes a hail diagnosis much harder to defend to an adjuster.
Hail damage vs blistering: the inspection checklist adjusters use
The table below covers the seven dimensions that matter most when separating a hail strike from a blister. Adjusters, inspectors, and experienced contractors all work through these same checkpoints.
| Dimension | Hail Damage | Shingle Blistering |
|---|---|---|
| Visual sign | Concave depression, fractured mat, torn granules | Raised bubble or popped rim, exposed mat beneath |
| Cause | Kinetic impact from hailstone | Trapped volatiles, moisture, or heat expansion |
| Distribution/pattern | Random swath following storm path, windward slopes | Uniform across field, often heat-trapping zones |
| Associated evidence | Dented gutters, vents, vehicles, siding | Damage confined to shingles only |
| Timing/progression | Sudden, after a known storm event | Gradual over months or years |
| Insurance coverage | Typically a covered peril | Usually excluded as maintenance or manufacturing |
| Recommended action | Document, call inspector, file claim | Monitor, check warranty, improve ventilation |
Field inspection checklist:
- Check all metal surfaces within 50 feet: gutters, downspouts, vents, A/C units, and any parked vehicles.
- Look at the roof from the ground with binoculars or a telephoto lens. Note which slopes show the most damage.
- If safely accessible, press gently on suspected strike areas. Soft or spongy = likely hail fracture. Firm = likely popped blister.
- Assess shingle age and condition. Older roofs with degraded granule adhesion can lose more granules during the same hail event than newer roofs, which can complicate attribution.
- Note the distribution. Clustered depressions following a diagonal swath across one or two slopes point to hail. Damage spread uniformly across all slopes with no collateral dents points to blistering.
- Record the date of the last known storm and cross-reference with local weather records or NSSL data.
Pro Tip: When both conditions exist on the same roof, photograph the edge profile of each suspect area. A hail strike shows a flat or concave center with no raised rim. A popped blister shows a distinct raised or curled edge around the exposed area. That edge difference is what separates them in a disputed claim, and it’s the detail most homeowners miss.
When both blistering and hail are present, adjusters will typically itemize them separately. Pre-existing blistering can reduce a payout through depreciation, so documenting the pattern and collateral evidence before the adjuster arrives is worth the extra hour.
What annotated photos from inspectors actually show
Real inspection photos tell the story adjusters need. Here’s what to look for in each type of image and what a contractor should capture for you.
A true hail strike in a close-up photo shows a dark, concave center where granules were displaced, with the underlying mat exposed and visibly fractured or discolored. The edges of the strike are relatively flat or slightly depressed. A popped blister, by contrast, shows a raised or curled rim around the exposed area, and the mat beneath is intact and firm. The difference in edge profile is the single most diagnostic feature in a disputed photo inspection.
Photo types to request from your contractor or inspector:
- Macro close-up of each strike or blister: Captures the edge profile, mat condition, and granule displacement clearly. Include a coin or tape measure for scale.
- Slope-wide contextual shot: Shows the distribution pattern across the full slope. A random swath of depressions on one slope supports hail; uniform pockmarks across all slopes support blistering.
- Metal-component evidence shots: Close-ups of dented gutters, vent caps, or A/C fins. These are often the deciding factor in a disputed claim.
- Multiple angles: Shoot each strike from two directions to show depth and edge profile.
Safe photo capture notes:
- Never walk on a steep or wet roof to get photos. Use a telephoto lens, a drone, or a ladder positioned at the eave.
- Capture images in good light, ideally with the sun at a low angle to cast shadows that reveal surface texture.
- Timestamp every photo automatically through your phone’s camera settings.
Other clues inspectors and adjusters look for
Storm records and contextual evidence can make or break a claim. A single photo of granule loss is rarely enough on its own.
Collateral evidence checklist:
- Dented gutters and downspout caps (aluminum dents easily at hail sizes above 3/4 inch)
- Dented or pitted aluminum window screens
- Damaged A/C condenser fins
- Vehicle hail dents, especially on horizontal surfaces like hoods and roofs
- Damaged outdoor furniture, garden equipment, or wood fences showing fresh impact marks
Pattern clues:
Hail damage concentrates on windward slopes and follows the storm’s travel path. If the northwest slope shows heavy depressions and the southeast slope is clean, that’s consistent with a northwest wind during the storm. Blistering distributes based on heat exposure and manufacturing batch, so it tends to appear uniformly across the field of the roof or in zones that get the most direct sun.
Using storm records:
Cross-check the date of suspected damage against local weather service reports or the NSSL’s mPING data to confirm a hail event occurred near your property. Adjusters give significantly more weight to a claim that pairs physical evidence with a documented storm record. If your neighbor’s car has dents from the same date, that’s additional corroboration worth noting in your claim file.
Hail size matters more than most homeowners realize. The NSSL notes that hail in the 1–1.75-inch range falls at approximately 25–40 mph. At those speeds, standard 3-tab shingles can sustain mat fractures that aren’t visible from the ground but compromise waterproofing within one to two seasons.
How insurance policies treat blistering vs hail
Coverage tendencies are fairly consistent across standard homeowner policies, though the specifics vary by carrier and policy language.
Hail is a named peril in most standard homeowner policies (HO-3 and HO-5 forms). If you can document impact damage with physical evidence and a corroborating storm record, you have a reasonable basis for a claim.
Blistering is almost universally excluded as a maintenance or manufacturing issue. The exception is early-life blistering on a new roof, which may fall under the manufacturer’s warranty rather than your homeowner policy.
Documentation checklist for a hail claim:
- Timestamped photos of all damage (close-ups and slope-wide shots)
- Photos of collateral dents on gutters, vents, and vehicles
- A written note of the storm date and time
- Links to or printouts of local weather service reports or NSSL storm data
- A written contractor or inspector report with annotated photos
What adjusters evaluate:
- Cause attribution: was the damage caused by impact or by pre-existing wear?
- Functional impairment: does the damage compromise the roof’s ability to shed water?
- Collateral evidence: are there dents on other surfaces consistent with the same storm?
If your claim is denied:
- Request a written explanation of the denial and the specific exclusion cited.
- Ask for a re-inspection with a different adjuster or bring your own contractor to the walk-through.
- Hire a public adjuster, who works on your behalf (typically for a percentage of the settlement) rather than the insurer’s.
- Invoke the appraisal clause in your policy if one exists. This allows both parties to appoint an appraiser and resolve disputes without litigation.
For a step-by-step guide to building a strong claim file, the Sladeroof documentation guide walks through exactly what photos and records adjusters expect.
When to call a roofer, inspector, or claims rep
Most homeowners underestimate how quickly hail damage can progress from “cosmetic” to “active leak.” A fractured mat that looks fine in October can be letting water in by March.
Call a professional immediately if:
- You see visible punctures or tears in shingles after a known hailstorm.
- There are widespread depressions across one or more slopes.
- You notice interior water stains on ceilings or walls within days of a storm.
- Multiple metal surfaces on your property show fresh dents.
- Your neighbors are filing claims or having their roofs inspected.
Monitoring is reasonable when:
- You have a few isolated popped blisters on an older roof with no recent storm and no collateral damage anywhere on the property.
- The blisters are small, the mat beneath feels firm, and there are no interior signs of moisture.
A professional inspection should include a written report with annotated photos, a field-test summary (thumb-press results, collateral sweep), and a clear recommendation on repair vs replacement. If the inspector suspects hail, the report should include the storm date, the pattern description, and a list of collateral evidence. That documentation is what supports a claim.
The NSSL’s data on fall speeds (25–40 mph for 1–1.75-inch hail) gives context for why even a brief hailstorm can cause damage that isn’t visible until the next heavy rain. Don’t wait for a leak to confirm what an inspection could tell you now.
What a Sladeroof inspection and claims engagement looks like
Sladeroof brings over 20 years of combined roofing and insurance experience to every inspection, which means the documentation they produce is built to satisfy adjusters, not just homeowners.
The typical process:
- Scheduling: A Sladeroof inspector arrives, usually within a few days of a reported storm event.
- Field documentation: Photo documentation of all suspect areas, metal components, and collateral surfaces, with scale references and multiple angles.
- Field tests: Thumb-press testing on suspected strike areas, edge-profile assessment, and a full collateral sweep.
- Written report: Annotated photos, field-test results, pattern description, and storm-date correlation.
- Insurance-claim packet: A complete documentation package the homeowner can submit directly to their carrier, including adjuster walk-through support if needed.
Credentials and proof points:
- 20+ years of experience in both roofing and insurance claims
- Impact-resistant materials available for replacement, including wind, hail, and fire-rated options
- 25-year leak warranty and 50-year product warranty on qualifying installations
- Hail protection and claims support documented on the Sladeroof service pages
Pro Tip: Ask your inspector to walk the adjuster through the report in person or by phone. Adjusters who review annotated photos alongside a contractor’s field notes are significantly more likely to approve a claim than those working from homeowner-submitted photos alone.
Sladeroof also offers public adjuster referrals for claims that are denied or underpaid, and can assist with the appraisal process if your policy includes that clause.

A roofer’s perspective on the diagnosis most homeowners get wrong
The most common mistake isn’t misidentifying hail as blistering. It’s the opposite: homeowners see granule loss after a hot summer and assume they have a hail claim, when what they actually have is a ventilation problem that’s been cooking their shingles for years.
Here’s the practical rule: if you can’t point to a specific storm date and find at least one dented metal surface on your property, the damage is probably not hail. Adjusters know this, and a claim built on granule loss alone, with no collateral evidence and no storm record, will almost always be denied.
The thumb-press test and the collateral-evidence check take about 20 minutes combined. Do both before you call your insurer. If the mat feels soft and the gutters are dented, you likely have a legitimate hail claim worth pursuing. If the mat feels firm and the gutters are clean, document the blistering, check your manufacturer warranty, and fix the attic ventilation before the next summer.
Sladeroof handles the inspection and the claim
Sorting out whether you’re dealing with hail or blistering is one thing. Getting a fair settlement from your insurer is another. Sladeroof does both, and the combination is where homeowners in Idaho, Arizona, and Wyoming consistently save money.

A Sladeroof inspection gives you a professional written report with annotated photos, field-test results, and a complete insurance-claim packet, built specifically to meet adjuster standards. If the damage warrants replacement, Sladeroof installs impact-resistant materials backed by a 25-year leak warranty and a 50-year product warranty, which means the next hailstorm is less likely to start this process over again.
Schedule a residential roof inspection or get insurance claim assistance directly through Sladeroof. If you’re not sure whether you need a full inspection or just a quick assessment, call and describe what you’re seeing. The team will tell you honestly what the next step should be.
Sources
The following sources were used in preparing this article. Each covers a distinct piece of the identification and claims puzzle.
- NSSL: Hail — formation and behavior
- InterNACHI: Asphalt composition shingles (Part 35) — blistering
- InspectAPedia: Roof hail damage vs. blister rash
- Hail Damage vs Blistering on Shingles: How to Tell the Difference | CapOut
Recommended
Ready for a real answer on your roof?
Slade Roofing pairs licensed insurance agents with licensed roofers. Get your free inspection in about 30 seconds.
Get My Free Inspection →